Style Me Green

AFFORDABLE ART

Erika @ Style Me GreenComment

Cultivating an art collection can be expensive and take years to perfect. When you are selecting pieces for your home you should consider your decor, and choose pieces that you love that will last the test of time. You don't want to rush it. One day when I was in the craft store buying spray glue for a school project I overheard a young married couple selection posters and art prints. The wife would say things like, "Okay, now we need a three foot poster for above the couch." Then the husband would walk around an pick out some things and add it to their pile. They were literally checking off the pieces as they went. There was no rhyme or reason to what they were choosing, just pieces that they thought looked okay, and fit their empty wall spaces. A rule of thumb that I like to apply when selecting art is, don't purchase art from the same place that sells posters of babies dressed up like flowers.

I love simple landscapes, vintage ad prints, and colorful abstractions. I find that I can only afford to purchase pieces for my home about 2 or 3 times a year depending on their price and size. To get around the hefty price tag that comes with art investment, I have framed all sorts of things from art show postcards to vintage playing cards. Here are a few ideas to get you going on a great collection of your own. I generally start with a simple wooden frame and most pieces look great framed in black, white, or gold with simple white mats. The piece above is a large sheet of marble paper, framed in an ikea frame. Wallpaper scraps, wrapping paper, or even the front page of a news paper could make a great statement.

I love this idea from the blog, Young House Love. They took paint chips and arranged them creating an ombre effect. This is such a versatile idea, it can be done in any color scheme, or on any scale- large or small.

One of my friend's made this piece for her husband as a Valentine's gift. Finding inspirational quotes can be a great way to celebrate your family, or like this example keep you motivated. I bet he thinks of her every time he reads it.


X-DESK TUTORIAL

Erika @ Style Me Green4 Comments
Monday I posted about all the DIY projects I worked on over the weekend, and as promised here is the tutorial for my desk. I want to preface this post by saying, I am not a furniture designer, or builder so this was a HUGE learning experience. The plans modified more than once due to miscalculations and plywood that wasn't, well, straight... But I am pleased with the overall completed design and I saved myself about $150 which you can't complain about! This post is really long and explanative, (pretty sure explainative isn't a word) so if you aren't going to build a desk, please enjoy the photos.


If you are going to build one yourself there are a few things you want to figure out, like, how tall do you want your desk to be, how deep and wide should it be, and if you need a drawer.

My desk is 32" high, 24" deep and 48" wide. (Because the lumber store sold 2'x 4' sheets of plywood) I had to use the computer to determine the angles at which my desk's legs met. I came out with a good even 100 and 80 degrees. (you can see this in the drawings below where the dimensions are notated) I then printed out a full size template of the angle so we could mark the 2x4s to cut for the legs.


 Using the dimensions above, which I drew up in AutoCAD, We measured, marked and cut the wood for the legs. We set the circular saw to 40 degrees to give them the right angle to sit at, then proceeded to use our template to mark them for the center cuts. To make an X shape out of the 2 separate pieces, you have to notch out 1/2 of each piece of wood so they slide together. (If this doesn't make sense scroll down and look at the pictures, then come back)


Once everything was marked on the legs we set the height of the saw to be 1/2 the depth of the 2x4. (1.75") And John just kept running the saw back and forth under the wood until he had notched out the perfect hole. See below:


Once all of the holes are notched out, you can glue and screw the legs together. I am not going to lie, there were 3 "practice legs that we made with scraps before we cut the good wood. The legs are the hardest part of this project and if you aren't good at math, find someone who is. (We had help from a structural engineer and it was still hard). You can do it!


Once the glue is dry, fill the screw holes and joints with wood filler. Let the wood filler dry, and sand. 


Once the legs were set we started on the top. The top is just a glorified box that opens in the front, where the drawer pulls out. We ended up buying 22" drawer slides that mount to the sides of the drawer, and the inside of the box. (You have to leave at least 1/2 an inch of space to allow for the instillation of the slides.)


The above image is John tacking the bottom of the drawer onto the frame. We learned this the hard way, because we aren't carpenters, but you have to leave enough space above the drawer to remove it once the desk is built. So my drawer is permanently installed, it cant be removed, oops! And honestly, my motto throughout the entire week long experience was "It's okay, no one will notice that," or "I will just fill it with wood filler!" So we built the box, without the top, built the drawer, and then screwed the top on once the drawer was neatly inside.


Installing the drawer glides is easy if you read the directions that come with them. The wind blew the directions away, so we had to figure it out on our own. You should be fine if you install the glides 1/8 of an inch in from the edge of the drawer and the interior of the box.


Once we had the top pieces assembled we screwed the legs onto a "base" piece made from a 1x6 that we trimmed down to 4" in width. You could leave out the base piece, but I felt like it looked like a picnic table without it. Then we screwed the legs to the bottom of our box.


I had originally intended on having the drawer slide into and be inset inside the box, so that the drawer front was mounted inside. But as it turned out the bottom piece of plywood was warped just enough that the drawer had a huge gap underneath it. It looked so dumb that I wanted to quit and walk away. John convinced me we could mount the drawer front on the outside of the frame, so it would hide the warping bottom. So I compromised on my original design, I liked having the drawer inside because it gave it the look of British campaign furniture. And I knew that mounting the drawer on the outside would make the desk look more modern, but at that point I knew I could select some more traditional knobs for the drawer and possibly make it okay.


Once you get to this point all you have to do is fill anything that bugs you with wood filler, sand, and paint. I painted on 2 coats of kilz 2 primer, and then sprayed on a final coat of gloss white. Let it dry fully before you apply your next coats so you don't get a sticky/tacky finish. Good Luck! If you want detailed plans of this design leave a comment. If I have enough requests I will work on getting a PDF available for print out.


DIY BOOKENDS

Erika @ Style Me GreenComment
I am up to my elbows in an office overhaul, and I have been sourcing great office accessories all week. I found a whole list of DIY projects that would be great storage and organization solutions. (Just what I need, to add more to the DIY queue). These bookends have made it to the top of my list, just what I need for my bookshelves. Happy DIY Weekend!


HOW TO EAT WITH THE SEASONS

Erika @ Style Me Green4 Comments

I have been busy out in the garden harvesting all sorts of goodies, so today I wanted to share a list for eating and selecting foods with the seasons. Planning out your garden all year round, and selecting foods from the market that are in season will help you save money, and ensure that you are choosing foods that were grown closer to your home. It takes so much more money and energy to grow, harvest, and transport, a tomato to South Dakota in the middle of February than in late August. I know the winter food list isn't as appetizing as the summer list, but hey that's what canning is for right?

Update: for a great list on foods most contaminated by pesticides, see this post. 

fruits and veggies in season all year round

GIVEAWAY: FUTURE STANDARD

Erika @ Style Me Green19 Comments

I am excited to announce the August Giveaway, and it's right in time for all your back-to-school fashion needs! We are giving one lucky reader a $75 gift certificate to Future Standard Jessica Althoff is the founder of Future Standard, an online boutique that provides ethical clothing and accessories. I love their motto, "We do not compromise on style and do not think our values should get in the way of looking great."

HOW TO ENTER:

1. Like Style me Green AND Future Standard on Facebook

2. After you've done these 2 things leave a comment below stating how you would use your gift card, if you don't have a blog or google account please leave an email with your comment, so we can notify you if you're the winner!

FOR AN EXTRA ENTRIES

1.  Follow Style me Green on twitter/pinterest, be sure to leave an additional comment on this post (up to 2 extra entries).

2. Mention this giveaway on twitter/facebook/personal blog, be sure to leave an additional comment on this post (up to 3 extra entries).

3. Pin this giveaway on pinterest, be sure to leave an additional comment on this post (up to 1 extra entry).

The giveaway ends Monday August 27th at 11:59 PM.

One winner will be selected using random.org and will be notified by email!

*Remember you have to comment to be entered, if you don't comment you can't win.

NATURAL SPLIT END TREATMENT

Erika @ Style Me GreenComment

I hate split ends, they make your hair look dry and tired. If you have split ends it usually means your hair is not getting enough nourishment and moisture. Harsh shampoos, going out in the sun, blow drying, straightening, dyes, and bleaches all dry out your hair. I swear I get split ends 30 seconds after I get a haircut... but fortunately there are a few things that can help improve the health of your hair right now.

- Eat foods high in vitamins A, B, C, E and K to keep your hair from unnecessary breakage. Try adding more sweet potatoes, dark leafy greens, carrots, oranges, and plums to your diet.

- Use a natural leave-in conditioner in your hair before brushing. One of the worst things you can do is start brushing through your hair with a hairbrush when your hair's still wet. You'll end up with breakage, frizz and split ends to show for it. I use a honey leave in conditioner. Mix 2 tbsp  honey in 4 cups warm water and apply it to your hair after you shampoo/ condition.  Leave it in your hair. It will control hair dryness/frizz.

-Drink at least eight to 10 glasses of water each day, full glasses, not sips. When you aren't hydrated, your whole body suffers. Your skin and hair will show signs of dehydration, and dry hair and breakage are two of the most obvious signs.

-Avoid using shampoos that contain alcohol as it dries out hair. Use shampoos that contain natural ingredients. Excessive washing with harsh shampoos makes your hair ends dry.  Also, do not use hot water to wash your hair.

-Let your hair dry naturally, this saves energy- and if you are going to use styling tools will cut down on the amount of heat you are exposing your hair to later. Having said that, try to avoid styling tools if you can. I usually leave my hair straight and only use an iron for special events. There are natural ways to curl your hair, try rollers or a sock bun with damp hair.

-If all else fails, shave your head- JK!  But, give this egg rinse a try about twice a month. It's pretty easy, and if you are set on sticking to shampoo and conditioner it will give your hair shine and moisture without using manufactured products.

how to get rid of split ends

Egg Rinse:

Mix egg yolk in 3 tbsp olive oil and 1 tbsp honey. Gently massage this mask in your hair and cover with a shower cap. Leave it on for half an hour and wash it with a mild alcohol-free shampoo.

ROSE FACIAL TONER

Erika @ Style Me GreenComment

It was a super slow DIY weekend, so here's a recipe for facial toner that I live by. I used to just use witch hazel because it gently cleanses pores and helps remove the last traces of dirt, oil, and makeup. It always left my skin feeling soft, moisturized and refreshed. But, recently I started adding rosemary and rose petals because it stimulates circulation to skin, and helps clear and revitalize congested or sluggish skin. Plus it smells great!

rose facial toner

INGREDIENTS:

3 1/2 cups witch hazel

1/2 cup dried rose petals

5 sprigs of fresh rosemary

DIRECTIONS:

Mix ingredients together making sure it is all blended well, let sit for a few minutes. Strain. Splash, or dab with cotton ball on your face after cleaning skin. Make sure to store in an airtight container.

HOMEMADE PESTO

Erika @ Style Me Green1 Comment

This weekend we harvested our first vegetables from that garden! We have been picking lettuce for a while, but this week our peas and tomatoes were finally ripe enough to pick. The whole garden has gotten quite out of control, so we had to cut back a few things, including our basil plants. We couldn't eat the basil fast enough, and it's like Medusa, you cut one stem and 2 grow back in its place. So, I decided we would make pesto.Which would go amazingly with this recipe.

homemade pesto recipe

Yields 2.5 cups of fresh pesto

INGREDIENTS:

1/2 pound of basil leaves, washed and dried thoroughly

4 oz freshly grated Parmesan cheese

1/4 cup pine nuts

3/4 cups walnut halves

1-1/4 cups extra-virgin olive oil

1/2 tsp salt

1 tablespoon chopped garlic (you can add more if you like garlic but I'm not a huge fan)

DIRECTIONS:

Heat walnuts and pine nuts in a dry, heavy skillet over medium heat for 5 to 10 minutes or until they’re golden brown and give off a rich, toasty fragrance. Stir or toss frequently for even toasting. Remove from pan to cool.

Chop the garlic cloves finely, sprinkle a teaspoon of salt on top and mash to a fine paste with a fork.

Place garlic and half of the basil leaves in the bowl of a food processor fitted with a steel blade. Process for 15 seconds.

Add the rest of the basil leaves and with the processor running, slowly pour the olive oil through the feed tube and process until the pesto is thoroughly pureed.

Add the Parmesan cheese and toasted nuts and puree for one more minute.

You can use it the right away. If you’re going to store pesto for a short period of time, place in a jar with a thin film of olive oil on top. You can also divide it into 1-cup portions and store in the freezer for a few months. Make sure to defrost in the refrigerator overnight.

*If you don't have a food processor you can use a good quality blender, just make sure to finely chop everything before hand.  If you want this to be vegan friendly just omit the cheese.

KALE CHIPS

Erika @ Style Me Green1 Comment

This weekend we tested out a recipe that I was a little bit leery about. It was homemade kale chips, and it seems like everyone is making them these days. I have a serious aversion to kale, I am not a fan. I only eat it when I put it in vegetable juice and it is hidden behind stronger flavors like, carrot and apple. But, I was pleasently surprised. In fact, we devoured these within minutes of making the first batch. And it only cost about $2.00. You have to taste these for yourself.

kale chips recipe

INGREDIENTS

1 bunch kale

1 Tbsp olive oil

1/2 tsp ground salt or seasoning salt to taste

Preheat oven to 350 degrees. Rinse and dry kale leaves. Remove kale leaves from stems. Place the leaves in a mixing bowl and drizzle with olive oil. Massage the kale until the olive oil is evenly coated onto the kale. Place kale directly onto a baking sheet and sprinkle with sea salt or seasoning. Don't cut the Kale or trim it down, the leaves will shrink dramatically in size so they can overlap on the baking sheet. Place the baking sheet in the oven and bake for 10-15 minutes or until crisp, moving the chips around and flipping them half way to ensure that they are evenly baked.

With an oven it is trial and error, you just have to keep checking them to see when they are done. If you have a food dehydrator you could use this recipe and dehydrate at 115° for 8-12 hours.

CLEAN GREEN: LAUNDRY TIPS

Erika @ Style Me Green1 Comment

Wash in Cold Water:

Last year we challenged ourselves to conserve energy and reduce our carbon footprint. One way we came out big was in the laundry room, believe it or not! I looked into many great sites on conserving energy and consuming less and I was surprised I could make such small changes for a big impact. For example, did you know heating water to do laundry is one of the largest users of energy in a typical home. My first response was, well it won't kill germs on things like towels if I wash them in cold water- wrong. It gets clothes just as clean as hot water, while using less energy and money, and preserving fabric color. No Brainer! Energy Star states that almost 90% of the energy consumed by a washing machine goes to heating water. That's a huge percentage! Each household that makes the switch to cold-water washing eliminates about 1,600 pounds (sign me up for that weight loss program!) of carbon dioxide emissions a year, according to the Sierra Club. Now we don't use any warm water to wash clothes, and we wait until we have a completely full load before starting, which in my home means only doing laundry once every two weeks!

eco friendly laundry hamper

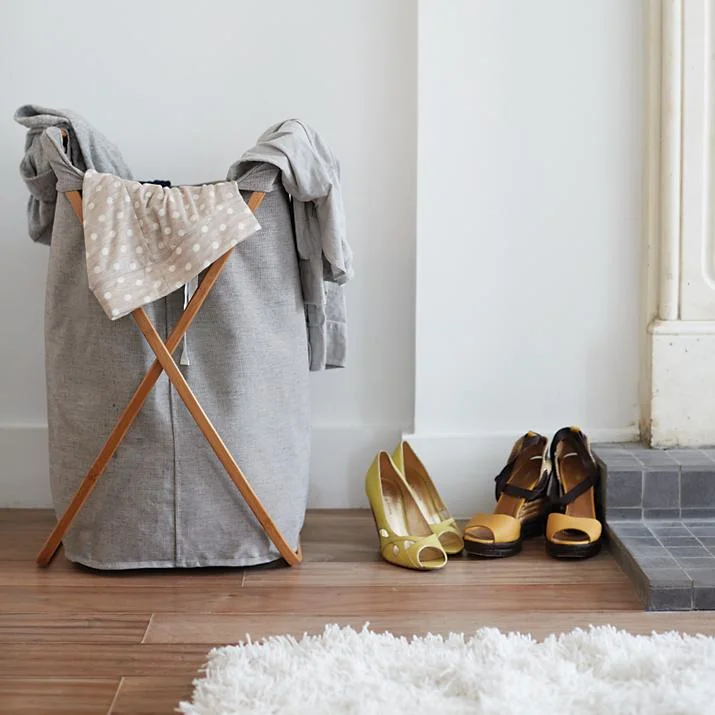
I love this eco-friendly hamper from Crate and Barrel's The Land of Nod

Don't Use Traditional Fabric Softener:

Although they may make your clothes feel soft and smell fresh, fabric softener and dryer sheets are some of the most toxic products around. Fabric softeners are made to stay in your clothing for long periods of time. As such, chemicals are slowly released either into the air for you to inhale or onto your skin for you to absorb. Dryer sheets are particularly noxious because they are heated in the dryer and the chemicals are released through dryer vents and out into the environment. Here is a list of just some of the chemicals found in fabric softeners and dryer sheets:

Benzyl acetate: Linked to pancreatic cancer

Benzyl Alcohol: Upper respiratory tract irritant

Ethanol: On the Environmental Protection Agency’s (EPA) Hazardous Waste list and can cause central nervous system disorders

Limonene: Known carcinogen

A-Terpineol: Can cause respiratory problems, including fatal edema, and central nervous system damage

Ethyl Acetate: A narcotic on the EPA’s Hazardous Waste list

Camphor: Causes central nervous system disorders

Here are some simple recipes you can use to replace traditional fabric softeners:

Fabric Softener:

1/2 cup white vinegar

Add to rinse cycle in place of liquid fabric softener.

This helps remove static, the combination of cotton and polyester is often the culprit behind static cling,

try drying natural-fiber clothes separately from synthetic materials. Better yet, line dry synthetic clothing, as it tends to dry fairly quickly anyway.

Scented Dryer Sheets:

Place a couple of drops of your favorite essential oil on a piece of wet cloth and put it in the dryer with your clothes (lavender smells great) and toss in with wet laundry. 

natural fabric softener recipe

Skip the Dryer:

According to "Project Laundry List" It typically costs 30 to 40 cents to dry a load of laundry in an electric dryer and approximately 15 to 20 cents in a gas dryer. Over its expected lifetime of 18 years, the average clothes dryer will cost you approximately $1,530 to operate. When you skip using the dryer you are obviously saving money, and energy, and only adding about 6 minutes of your time to hanging clothes on the line. But here are some simple tips to make the most of your time. I always hang any synthetic clothing, like I pointed out above, it dries really quickly and most aren't designed to go in the dryer anyway. I put shirts and pants on a hanger and hang from my shower rod- and lay out delicate clothing on a drying rack in the bath tub. (You could do this anywhere really, but my bathroom is right next to my laundry room.) I hang all towels and rugs outside on our railing in the summer, and on doorknobs inside in the winter. 

What about Ironing?

I don't iron, first of all its 2012, who still irons... Although my grandmother thinks it is a sin that we don't even own an iron, I'll tell you how to get around it. Towels can be really stiff and scratchy if they were hung outside. To combat this I toss all of the dry towels in the dryer with a wet cloth. You can add some essential oils to the cloth if you want them scented. It takes less than 5 min and they come out soft and fresh. The same stiffness can happen to jeans and t-shirts. Once these are dry I just mist them with a spray bottle of water. It loosens all of the wrinkles and they take about 10 min to air-dry. This is also a great tip for traveling. I always pack a mini spray bottle in my luggage, when I get to my destination I hang up any wrinkled items and give them a good spray.

A drying rack like this one is a great option for a small laundry room.

DIY HEADBOARD

Erika @ Style Me Green13 Comments

Once the snow melted, about mid May for us, I decided I needed to finish this crazy DIY project that was hanging over my head, literally. I inherited this great solid wood door when my parents replaced the door to their shed. I knew I wanted to turn the door into a headboard, but it was in rough shape- I guess being exposed to the elements for 40 years does that to a girl. 

We started by scraping off all the loose paint, if you do this at home be sure to wear a mask in case you are dealing with lead paint. Step two was cutting off the bottom of the door. It was about 4 inches longer than the rest of the frame, and once it was cut, it would be the perfect size for a king-sized bed. Keep in mind for a headboard you want about 2-4 inches larger than your actual mattress, a lot of it comes down to personal preference- but once your bedding is on you don't want the headboard to look like it shrunk. I ended up making mine 2" wider than the mattress.

Once the door was cut down to the proper size John left me alone to do the rest by myself. Apparently no one thought I could use the circular saw unsupervised... Probably for the best.  I went to town filling the cracks and dents with wood filler. When it was dry I sanded it down with an electric circular sander.  Then I refilled any holes that persisted, and repeated sanding.

Because I was dealing with raw wood I went ahead and used KILZ latex primer. I painted it on with a foam brush. But for efficiency's sake, and because I am the most impatient DIYer ever,  I sprayed on the second coat of primer, which, saved me about an hour of work time and an hour of drying time. I painted it with Benjamin Moore's Misted Green, it took two coats to cover the head board and the legs.

Once everything had cured I screwed on the legs with metal plates. (On the back I put 2 screws in the leg and 2 screws on the headboard) On the front I put one screw into the headboard, and 3 in the leg. The mattress and pillows cover these up- but I did paint them so they blended in better.

I made mine with 3 legs so the middle was well supported, and I made the legs 3" higher than the top of my mattress. I have 12' ceilings, so I had to make up for that with a tall headboard. If you don't have any antique doors laying around, I'm sure with some careful mitering you could also make this style of headboard with a sheet of plywood and some 2x4s!

 If you like the fern botanicals above my headboard you can print them here. Have you tried to make your own headboards? I'd love to see.

(Update: We got new bedding I love how simple and fresh the white feels. The Euro Shams are from West Elm, the rest of the pieces are from Sferra Linens, Grant Blanket and Grande Hotel duvet and shams.)

NATURAL BUG REPELLENT

Erika @ Style Me Green1 Comment

I never use bug spray, but after being bitten by what I am sure was 1,000 mosquitoes, I was super determined to find a great insect repellent for the summer. I didn't want to buy any sprays that contained DEET (read about DEET  here and why it's not good) and after doing some light research I determined there aren't many products you can buy on the market, that are natural repellents. So, in my usual fashion, I decided to make my own. Homemade repellents will repel mosquitoes, but they require more frequent reapplication (at least every 2 hours). Because of the differences between types of mosquitoes, recipes that contain multiple essential oils tend to be more effective than those containing a single ingredient. See a list below of essential oils that can be used as insect repellents.

  • Citronella Oil
  • Lemon Eucalyptus Oil
  • Cinnamon Oil
  • Castor Oil
  • Rosemary Oil
  • Lemongrass Oil
  • Cedar Oil
  • Peppermint Oil
  • Clove Oil
  • Geranium Oil 

The key is you need a base to mix all of your oils with. Like, witch hazel, alcohol, or oil. To make the repellent strong enough to keep away the bugs, but gentle enough for kids and animals, a 10:1 ratio works best. Mix 10 parts base with 1 part essential oils. You can choose a variety of oils to mix, but if you don't want to experiment at home, or you hate math like me, here is a fool proof recipe- just combine the following ingredients and pour into a small spray bottle:

LEMON BLACKHEAD REMOVER

Erika @ Style Me GreenComment

I'm always on the lookout for natural beauty tips. Recently, a friend told me about this black-head remover and I wouldn't have believed it if it hadn't of come from a trusted source. I can't tell you how annoyed I am with black-heads on my nose. I have pretty fair skin, and its usually clear when I eat well- but I ALWAYS have black-heads on my nose, I have tried everything and never had success. But this really worked for me.

natural black head remover

You just need half lemon, put 3-4 drops of honey on it. Now, rub the lemon on your face for some time, make sure you emphasize on the black-head prone areas like nose, chin etc. Leave the lemon and honey mixture on your face for 5 minutes and then wash it with cold water. You will be able to see the results immediately. The lemon juice will also fade other marks and spots on the face, and the honey will moisturize. Honey and lemon both have antibacterial properties.

ECO OBSESSION: SUCCULENTS

Erika @ Style Me GreenComment

If you haven't already started a fun summer succulent project it is about time! I am a little obsessed at the moment, there are so many ideas out there floating around. Succulents can be used as so much more than just another house plant, although, I just have mine in white ceramic pots lined up in my kitchen. I hate house plants, and succulents are about the only flora I let inside my home, but this is going to be my motivation to start a succulent planter box to hang on my porch wall. I put together some other ideas i thought would be fun. And you can always find great DIY ideas on Pinterest!

And if you don't have a green thumb, or time to go in search of all your succulent planting needs- West Elm  has you covered. They have great kits to get you going on all sorts of succulent planters, they even ship you the sand!

NATURAL TEETH WHITENING

Erika @ Style Me GreenComment
natural teeth whitening recipes

I have two go-to methods for natural teeth whitening at home. Both were passed down from my grandma, she knows where its at y'all. They are great if you have sensitive teeth, plus you can avoid the high price tag that comes with at-home whitening kits. Most people don't realize that the chemicals in most commercial whitening kits, can actually harm your teeth and gums. 

SLAT AND LEMON RINSE:

To whiten with lemon and salt, just stir up a solution of three parts lemon juice and one part salt, and swish. Be careful not to swallow the solution, it doesn't taste amazingly fantastic believe it or not.

If you have sensitive teeth, or an open sore in your mouth this rinse may be too strong for you. Pay attention and use your own best judgment.

BAKING SODA OR HYDROGEN PEROXIDE:

If you want to boost your whitening power you can swish with hydrogen peroxide, and brush your teeth with a paste made from baking soda and water (separately don't combine these methods at the same time). I usually just wet my tooth brush and dip it into a small bit of baking soda, and whatever sticks to the brush is what I use to brush the top teeth with, then I rinse the brush and repeat for the bottom teeth.

Don't swallow hydrogen peroxide or baking soda either, I guarantee that's a bad idea.

NATURAL HAIR BRIGHTENER

Erika @ Style Me GreenComment

In the summer when I know I will be out in the sun for about an hour or so I make this recipe for natural highlights. Its so easy and after a few applications its really noticeable and gives your locks a fresh sun kissed look.

INGREDIENTS

1 cup of lemon juice

3 cups chamomile tea (brewed & cooled)

I mix into a squirt bottle and spritz the crown of my head before I go outside to garden or on a hike. If I am going to just lay out in my backyard I pour over damp hair then let sit for an hour while I sit in the sun. Once you are done you should rinse it out of your hair, and follow with whatever conditioner you usually use.  The lemon juice will dry out your hair, so you don't want to leave it on for a long period of time. The sun is the vital ingredient in this recipe, so be sure you spend sometime outside!

HOW TO BUILD A RAISED PLANTER BED

Erika @ Style Me GreenComment

This past weekend we spent over at the parental's building two raised veggie beds. They didn't have much room in their actual yard for these planters so we decided to clean out one side of the alley and build them there. The only problem was- there was a literal mountain of dirt that had been there for who knows how long- plus yard waste and pallets. 

how to build a raised planter

Once we cleared out all of the pallets and debris, we began pulling old pieces of cedar and lining them up on the road to figure out which pieces weren't warped. Using reclaimed pieces of wood allowed us to make both beds for just $20. We measured out the length of all the boards and marked them, and John used a circular saw to cut down all of the individual pieces. We used 2x4s for all of the sides and 4x4s for the corner braces. Two screws held each board to the corner joints, and one brace in the center of the longest sides kept the bed from bowing once filled with dirt. I realize these pictures make it look like John did all the work but I was there, I promise.

We ended up with the first bed measuring 123" x 69" because that made for the fewest cuts and was the perfect width to allow the snow plow access to the road in the winter. The second bed ended up being 100" x 69". To protect the seeds from scavenging birds and inclement weather, we constructed a cover using PVC pipes. We used a 1" diameter pipe that was cut down and screwed into the bed with pipe strapping. This created a "holder" for the 1/2" pipe that we bent over the top of each box. The large bed had three hoops, the smaller one only used two. And we did not cut the 1/2" pipe at all. At this stage I am pretty sure the neighbors thought we were making a covered wagon... The hoops make it easy to drape a clear tarp over to create a mini greenhouse for seedling.

MEAN GREEN SMOOTHIE

Erika @ Style Me GreenComment
green smoothie

INGREDIENTS

1 Banana

Handfull of spinach

1 cup orange juice

6-8 ice cubes

This recipe serves two.

After my morning workout I like to make fresh vegetable juice or a smoothie. This is my favorite smoothie to make. It's packed with Vitamin C and it tastes so fresh. All you have to do is put everything in the blender until its smooth. You can use store bought or fresh orange juice, and every now and then I toss is some blueberries or strawberries if I have them. What is your favorite post workout snack?

AVOCADO DEEP HAIR CONDITIONER

Erika @ Style Me GreenComment
deep conditioning treatment

INGREDIENTS

1 cup of  mayonnaise

1/2 of an avocado

INSTRUCTIONS

Put the mayo and avocado together in a medium bowl and mix, it is easier to use your hands.  When it turns a minty green color you've got it. Smooth into hair all the way to the tips. Put on a shower cap or wrap your head in a towel. Leave on for 20 minutes. If you want a deeper conditioning put a hot, damp towel around your head.

If you have really long hair like me you probably only want to conditioning at the ends. To do this I cut the ingredients in half and apply only to the ends and just wrap them. John laughed at me the entire time I was doing this, but we had 1/2 an avocado that was going to go bad so it was win win! I love how shiny may hair was and it really helped my frizzy ends.

SPRING CLEANING CHECKLIST

Erika @ Style Me GreenComment

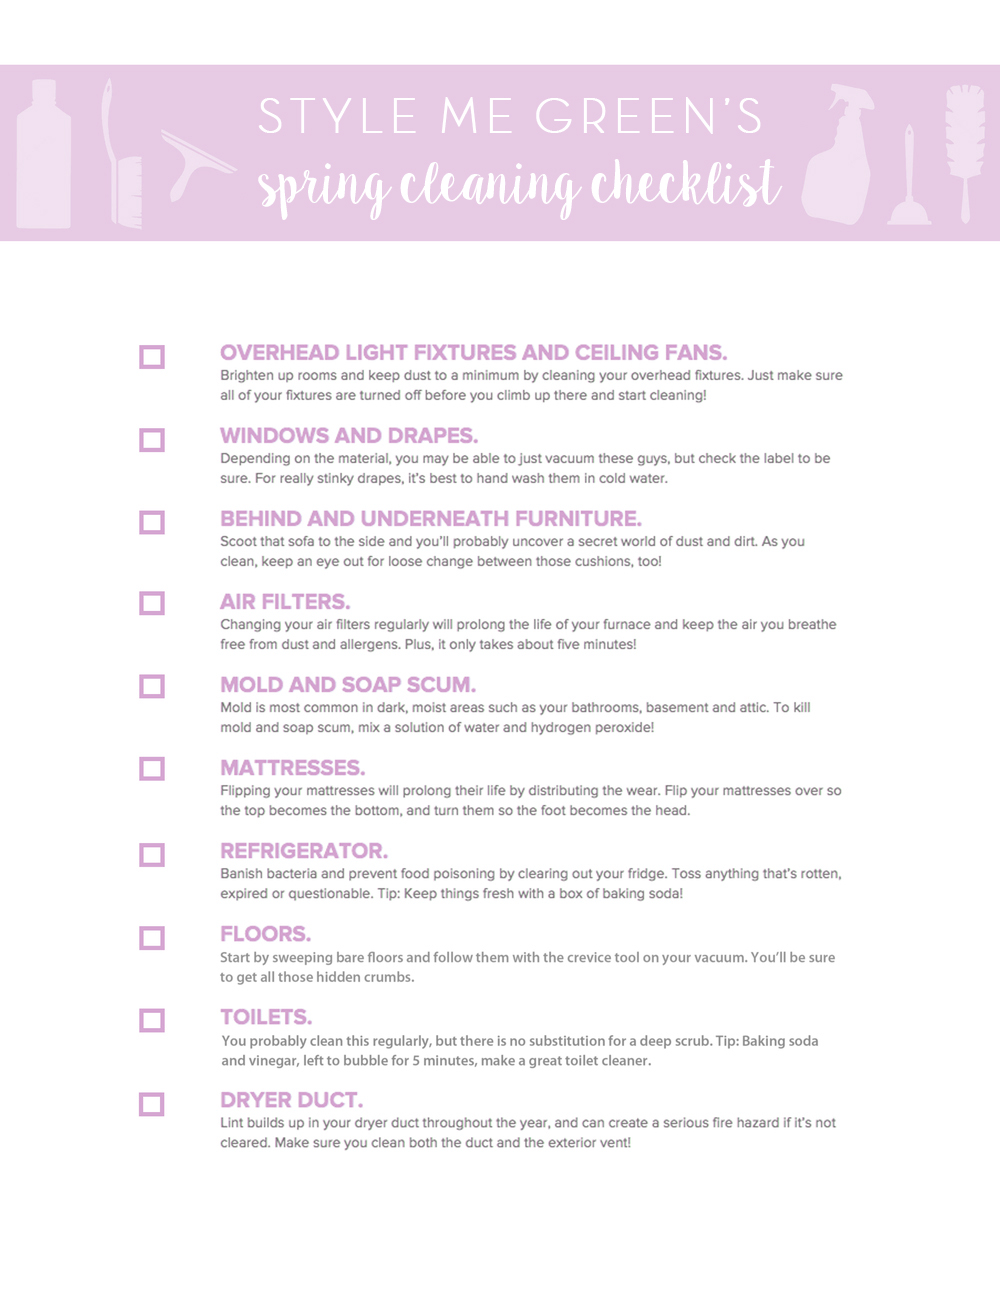
Now that you are so EXCITED to do a little spring cleaning, and you have mixed up all of your home cleaning products here is a checklist. I know I am excited to get my summer linens out on the bed this weekend, and I've got a little DIY sewing project to share with you next week, assuming nothing goes wrong! I'd love to see your spring spruce-up projects.

spring cleaning checklist