Style Me Green

Erika @ Style Me Green

ALOE + ROSEWATER FACIAL SETTING SPRAY

Erika @ Style Me GreenComment

The summer heat has really started to set in, which means my makeup is usually melting off my face.  A few weeks ago I talked to an esthetician who recommended a facial setting spray and listed a few brands she liked. She said it basically sets your makeup for the day and can really help those with oily skin. After reviewing some of her recommendations I wasn't loving some of the ingredients.  I then came upon a product that was not only ingredient friendly, but I thought I could make myself. If you aren't into making your own beauty products you can check out this option in the link below. 

Ingredients:

Witch Hazel

Green Tea

Rose Water

Aloe Vera (natural, in liquid form, not the gel)

Distilled Water

Essential Oil

Directions:

Pour 1/3 cup witch hazel into a 3 oz misting bottle (usually in the travel section of the drug store). Then  add 3 tablespoons of green tea, strained. Next combine 1 tablespoon of both aloe vera and rose water.

Add a few tablespoons of distilled water, and a few drops of essential oil if you prefer, it is for fragrance only.

After applying your make-up, Lightly spritz face and let dry, don't touch your face or move. (I made the mistake of looking down and got mascara on my under eye area)

BASIC RISOTTO WITH CAULIFLOWER

Erika @ Style Me GreenComment

I was a risotto virgin before we made this recipe- John had made it before, and I had indulged in some great varieties at restaurants. But I had been wanting to try my hand at making risotto, and our five-week vegetarian challenge gave me the best excuse. I adapted this recipe from this Simple Risotto recipe found here.

 If you need a basic risotto recipe that you can add mushrooms or other veggies to, this one makes a great base. I was surprised at how well this recipe turned out considering everything I had ever heard about making your own risotto.

Ingredients:

1 head cauliflower

2 tablespoons olive oil

1/2 teaspoon salt

7 cups vegetable broth (you could probably make this work with 6 cups if you had to)

2.5 tablespoons butter

1 large shallot, diced

3/4 cup dry white wine

1.5 cups Arborio rice

2 to 4 cups spinach leaves

1 cup parmesan cheese

1/2 tsp salt

 pepper to taste

Directions:

Preheat the oven to 450°F.

Place broth in a medium sauce pan and heat to a simmer; reduce heat and keep warm.

Cut the cauliflower into medium small florets. Toss the cauliflower, olive oil,and 1/2 teaspoon of salt in a bowl. Place cauliflower on a parchment lined baking sheet and roast for 30 minutes in the oven. You can stir them about halfway through baking. When they are tender and slightly browned they are done.

While the cauliflower is roasting, mince the shallot. In a large skillet add the shallot, butter, and 1/2 teaspoon salt, and heat to medium high. Once the butter is simmering, reduce heat to medium, and cook until the shallot is translucent.  Stir in the rice, coating it with the butter mixture.  Now you can increase the heat to medium-high and leave it there for the duration of the cooking process. Refer to the images above when adding your liquids.

Add  the white wine, I like to use Sauvignon Blanc when cooking. Stir the wine and rice constantly until liquid is almost evaporated. At this point, you can start adding the broth. Add the broth in 1/2 cup increments, and stir frequently until broth is almost absorbed. Repeat until rice is tender, but still al dente, you shouldn't let the rice absorb all of the water once it is ready because you want to have a bit of "sauce" left.

Stir in the parmesan cheese, and the cauliflower. We added spinach leaves because we had them, but you could also substitute kale or mustard greens. Keep stirring the ingredients until they are all incorporated and your greens have begun to wilt. Remove from the heat and season to taste.

PORTOBELLO SANDWICH WITH TZATZIKI

Erika @ Style Me GreenComment
We made this recipe on Sunday, because we had some leftover tzatziki sauce and I was worried it was going to go bad. Being on our 5 week vegetarian challenge has made us a lot more creative in the kitchen, and has really gotten us out of our usual dinner rut. I can't wait to share the whole meal plan with you- only two weeks left! What has probably surprised me the most on this menu is how we don't really miss some of the old meat dishes we usually ate. I was sure I'd be craving a burger by week three, but this sandwich rivals some of the best burgers I have ever eaten!


Grilled Portobello Sandwiches

Ingredients
2 portobello mushrooms
2 tablespoons aged balsamic vinegar (I love Nappa Valley Naturals brand)
2 tablespoons olive oil
Focaccia bread
Tzatziki sauce (see below)
1 Red onion
4 oz Feta crumbles


Directions

Preheat your grill to medium-high heat. (We don't have a real adult grill so I did this on the George Foreman, which is what we use for paninis as well).

Lightly drizzle your mushrooms with olive oil. I also used balsamic vinegar because I have been putting it on almost everything lately, and it makes the flavors really stand out. Brush on for an even coat and let marinate.

Make the tzatziki sauce, see below, then slice the onion.

Grill the mushrooms for 4-5 minutes on each side.

Slice the focaccia bread, and drizzle a bit of balsamic. Add a dollup of tzatziki, and layer on some onions. Cut the mushrooms in half, and lay one of the halves on each sandwich. Then add the feta crumbles, and the other half of bread. Serves 4


Tzatziki Sauce

Ingredients
1 cup plain Greek yogurt
1 cup diced cucumber
1/4 cup fresh dill – minced
1/8 cup lemon juice
1 garlic cloves – roasted
1/4 teaspoon salt
1/8 teaspoon pepper

Directions
Combine all ingredients in a medium bowl check for seasoning. Add more dill, lemon, garlic or salt/pepper if you wish! Serve immediately or store in the refrigerator for up to 5 days.

TOASTED GOUDA QUESADILLAS

Erika @ Style Me GreenComment

Our Vegetarian quest continues. This recipe is primarily why I couldn't be a vegan- I have pretty much given up dairy except for cheese, its my food weakness. You can't make a tasty quesadilla without cheese. We had family from Germany visiting us last week, one evening for dinner we had a great cheese plate- but so much smoked gouda left over. So this smoked gouda quesadilla recipe was born out of necessity.

gouda quesadillas

INGREDIENTS:

2 tablespoons olive oil

1 1/2 large onions (white or yellow)

1 1/2 tablespoons water

1/2 cup barbecue sauce

6 ounces smoked Gouda cheese

1/4 cup chopped cilantro

1/4 cup Italian parsley

4 flour tortillas

DIRECTIONS:

Slice the onions. Chop the cilantro and parsley. Grate the cheese.  In a large nonstick skillet, heat the olive oil, and add sliced onions. Saute for about 5 minutes, until soft. Add barbecue sauce and water; stir until the onions are completely coated. Turn off heat.

Spread onion mixture, cheese, and greens on half of each tortilla, and then fold in over, this way you can toast 2 at once. Place the quesadillas back in the skillet.  Cook until toasted and the cheese is melted, about 3 minutes per side. Cut quesadillas in half, and serve. I added a bit of avocado to mine, and John added hot sauce and salsa. We both loved them!

QUINOA AVOCADO CHICKPEA SALAD

Erika @ Style Me GreenComment

John and I decided to try out being vegetarians for a few weeks. Because we do our grocery shopping one day per week now, I decided to make a simple meal plan. That way we could make multiple dishes, with similar ingredients, so fresh fruits and veggies wouldn't go bad before we could get to the market again. (We live a block away, and tended to go everyday- which is great for having fresh food- but we wasted so much time!) This week we had dishes that included tomatoes, cilantro and basil. We created a 5 week plan, so I'll share a few recipes from each week, and at the end of the plan I'll share a printable file of the plan so you can try it out too! Last night's dish was this salad, it was filling and I loved how the lemon dressing brought out all of the flavors of the veggies.

quinoa chickpea avocado salad

Ingredients:

1/2 cup dry quinoa

2 cups water

1 can chickpeas, rinsed

1 cup cherry tomatoes cut in half

2 avocados diced

2 cups spinach

1 bunch cilantro

1/4 cup onion

2 small cloves garlic

For the dressing:

1/3 cup lemon juice

2 tsp. mustard

1 tsp. agave nectar or similar sweetner

2 tsp. olive oil

1/2 tsp. cumin

salt and pepper to taste

Directions:

1. Make your quinoa first. Add quinoa to the water and turn on the heat to medium high.  Let the quinoa come to a boil, then reduce heat to medium and allow to simmer. Cook quinoa for about 15-20 minutes, until the water is absorbed.  Remove it from the heat, but keep the lid on.  Set it aside.

2. Finely chop your spinach and cilantro. Add the greens to a bowl, and set aside.

3.  Next take your onion and garlic and finely dice those, and add to the greens mixture. Next add your chickpeas and diced tomatoes.

4. Dice your avocados, and add them to the bowl. I like to cut the avocado in half, remove the pit and slice them while they are in the skin (it's a lot less messy). Then stir in quinoa, and mix all of the salad ingredients.

5. Make your dressing by whisking all the ingredients together. Pour over salad, and mix until combined. I like to put it in the refrigerator for about 10 min. I think it tastes better slightly chilled.

DIY CONTAINER HERB GARDEN

Erika @ Style Me Green3 Comments

It is still a bit to early around here to get our real raised beds planted. I wanted to get our herbs going so that we had as much time as possible for them to mature. I had set aside this old crate I found at an estate sale last year, and it turned out to be the perfect home for our herbs!

I had to line the interior with plastic, because there were spaces in the base of the crate, and I didn't want the wood to rot. I used an industrial sized trash liner, and cut off the excess, so only about 4" of bag hung over the edge. Because my crate had handles I didn't want the level of soil above that, so I folded over the plastic and stapled it to the inside of the crate just below the handle holes. Then all you have to do is fill the bag with soil and plant your herbs. This would also make a great flower bed if you live in an apartment, and don't have a yard. We have one more crate hiding out in the shed, I think it will make a great Mother's Day gift.

ROASTED BRUSSLES SPROUTS

Erika @ Style Me GreenComment

I was craving brussels sprouts this weekend, which isn't a phenomenon I am accustomed to- So I picked some up at the market thinking I would try roasting them so the leaves crisp up like my kale chips. I was going blind here just hoping this was going to work- It must have been a long week because I didn't even think to k to Google "recipe for roasting brussels sprouts."  It took a little guessing on the time but I think I got it just right at 20 min. with a turn of the sprouts halfway through.  They taste so good this way, if you aren't a sprout fan you should really give them a second try. I'm hooked. 

roasted brussles sprouts

Ingredients

1 1/4 lbs brussels sprouts

2 teaspoons extra virgin olive oil

Salt and pepper to taste

Directions

Preheat oven to 450 degrees F.

Trim and halve sprouts. In a bowl toss sprouts, 2 teaspoons oil, and 1/4 teaspoon each salt and freshly ground black pepper to evenly coat. Place on an aluminum foil or parchment lined jelly-roll pan, roast 10 minutes, then turn them, and roast for 10 more min.

BANISH UNDER EYE CIRCLES NATURALLY

Erika @ Style Me GreenComment

Have you ever had one of those mornings where you get up, look in the mirror, and you look like you didn't sleep a wink. It only takes one person saying, "You look exhausted," or "Are you sick?" before you realize you probably look like a hot mess. It seems those unsightly dark under eye circles can say a lot about your health. Too much caffeine, stress, lack of sleep, and vitamin deficiency can be just a few culprits.  Here are some natural remedies to remove under eye circles.

how to get rid of under eye circles naturally

Chamomile Tea Bags

 Steep some chamomile tea bags in hot water, then rinse in cool water to create an eye-pack. Just putting these on your eyes for about 20 minutes will help reduce puffiness and can help diminish dark circles quickly.

As Cool as a Cucumber

Sliced cucumber on your eyes isn't just for the movies, it is a trick used by many  spas in luxury facial treatments. Just a couple of ice cold slices on your eyes will help reduce puffiness and tighten and tone the under eye area. (If you are in a rush and don't have a cucumber lying around the back of a cold spoon can have the same effect, in a pinch.)

Drink up, and Go Salt-Free

 Too much salt usually leads to fluid-retention, which  can lead to puffiness under your eyes. Remember to drink plenty of water and reduce your salt intake, it will help you flush out toxins. You'll notice a visible change in just a day.

Dark circles under the eyes are more prominent because that area is so delicate and thin. You can improve your overall skin tone and appearance with a healthy diet and exercise, but when those stressful times and sleepless nights start to take their toll, just take care of the problem with a natural remedy for long-term benefits.

HOMEMADE LOTION

Erika @ Style Me Green2 Comments

Winter is killing me right now, I have Spring fever like you can't imagine. John made fun of me the other day for taking a nap in the sun spot on the floor like a cat, its that bad. I have been trying to find simple ways to help combat the cold-month blues. One was getting my skin ready for spring! I love this simple DIY lotion recipe it only has 2 ingredients and its just about as natural as you can get. Coconut butter is an great moisturizer and promotes elasticity in skin, and extra virgin olive oil is filled with vitamin E. If you can't find coconut butter at your local market here is a great one.

homemade lotion recipe

All you have to do is mix two teaspoons of coconut butter and about 8-10 drops of extra virgin olive oil together in a bowl. Just apply a nice even layer anywhere your skin needs that added boost of moisture. I like to give my knees, elbows, and feet just a bit more attention. I like to make it in small amounts so that there isn't a lot left over. If you do have some extra, cover it and pop it in the fridge. (Be sure to label it, I have a whole shelf designated to beauty products in the fridge so John doesn't  accidentally eat my face masque or hair conditioner.)

HOW TO MAKE YOUR OWN CHALKBOARD PAINT

Erika @ Style Me Green1 Comment

I was at the craft store yesterday and saw a little bottle of chalkboard paint that cost $13.00 --excuse me-- that's more than we pay for Hulu and Netflix each month (aka how I get my Downton Abbey and Bachelor fix) So here I am to share my top secret chalkboard paint recipe with you. I love it because its so easy a child could make it, and you can use ANY color you can contrive! If I can convince John I might just paint an entire wall in my office to be my new chalk board inspiration wall.

Start with flat-finish latex paint in any shade. For small areas,  mix 1 cup at a time. Pour 1 cup of paint into a container. Add 2 tablespoons of unsalted grout. Mix with a paint stirrer, carefully breaking up clumps. Apply paint with a roller or a sponge paintbrush to a primed or painted surface. Work in small sections, going over the same spot several times to ensure full, even coverage. Let dry.  Smooth area with 150-grit sandpaper, and wipe off dust. To condition: Rub the side of a piece of chalk over entire surface. Wipe away residue with a barely damp sponge.

make your own chalk board paint

1 / 2 / 3 / 4 / 5 / 6

TORTELLINI SOUP

Erika @ Style Me Green1 Comment

I'm a huge advocate of eating soup in the winter, its easy, its affordable, and best of all it warms you up! We have been loving this simple tortellini soup recipe, because you can toss any savory veggies you have on hand right in and it always tastes great. I have made it on the stove or in the crock pot, its so easy and will impress any dinner guests.

tortellini soup recipe

INGREDIENTS:

2 celery stalks, chopped

3/4 cup sweet onion, chopped

2 large cloves garlic, chopped

3 spring fresh thyme

1 (15 oz.) can organic diced tomatoes and juice

4 cups low-sodium vegetable broth

10 oz. fresh tortellini

a handful of fresh parsley or spinach

Salt and pepper, to taste

DIRECTIONS:

In a large pot saute celery for about 3 minutes, stirring often, Add the onion and cook for 3 minutes before adding the garlic and cook for another minute. (You could also add corn, or carrots to the soup if you have them on hand)

Add the thyme, tomatoes and broth and bring all to a boil. Add the tortellini to the pot and cook according to the manufacturer package directions. Remove the soup from the heat, mix in your parsley or spinach (I usually use parsley because I have an aversion to cooked spinach) Finally, season with salt and pepper if necessary. Makes 4 large servings. 

HOME REMEDIES FOR COLD/FLU SEASON

Erika @ Style Me GreenComment
As you know I have been a bit MIA this month because I have come down with a serious cold, twice. I know, you are thinking how can I be that awesome. I refused to go to an actual doctor, because they were going to tell me what I already knew, oh you have a cold miss-- drink lots of water and sleep it off. So that's what I did for the first few days, and then I slept right through the premiere of "The Bachelor" and that's when I knew things had to change... No cold messes with my Monday nights and gets away with it. Here's where every cold home remedy I ever heard in my life comes into play. Some really worked and others were just an awful idea period, but here goes:


Spices: Ginger and Cayenne
Often used in traditional Chinese medicine to treat the common cold, ginger has long been a preferred home remedy for stuffy noses and sore throats. Its has anti-inflammatories that help to reduce the discomfort of a sore throat. Add 4 quarter-sized pieces of peeled ginger to 2 cups of water. Simmer for 15 minutes. Discard the ginger and enjoy the warm flavored water with a bit of honey and lemon.

Rich in capsaicin, a known natural expectorant, just a little bit of cayenne can go a long way towards easing unpleasant and uncomfortable congestion. When consumed, this healing compound immediately starts breaking up congestion in the throat and nasal passages while flushing out any potential infection-causing irritants. I tried pouring it in a glass to gargle- big huge mistake. My mouth was on fire for hours, instead try this:   Add a bit of cayenne to ginger tea or warmed lemon water. It is also a delicious addition to broth-based soups. Just remember to start small.


Garlic
Garlic is a known virus and bacteria killer, so if you have an ear ache/infection a few drops of garlic oil are supposed to ease symptoms and help fight of the infection. In addition you can prepare meals that have fresh garlic, and soak your feet in a garlic foot bath. I have never been this desperate, but I have been told if you do this at the beginning of a cold it will disappear the next day.

Fill a large pot with water and bring it to a boil. Use about 10-15 cloves of garlic, peel them, and smash them, don’t cut them. Then place the boiling water into a large bowl so you can soak your feet.  Put the garlic into the boiling water, and allow it to cool a bit before you stick your feet in. Chill out in your foot bath until the water gets colder than your feet. Dry off, and you are done!


Honey
If you have congestion in your nose, the chance is it has also migrated to your throat. And it just gets worse as you sleep.  Honey is supposed to be as good, if not better than cough syrup because of its antimicrobial and antioxidant effects. It's also soothing to an irritated throat. Before you hit the hay, take two tablespoons of natural honey. Mixing it with tea or warm water may help it go down easier.

Hydrogen Peroxide in your ears:
I got this one from a coworker, her daughter-in-law swears by it so I was willing to give it a go.
You take a solution of 3% hydrogen peroxide, preferably food grade and a dropper. Tip your head to one side and drop a few drops of hydrogen peroxide into your ear. It tingles for a second and tickles your ear, but that means its working! Let the hydrogen peroxide sit for a couple of minutes, then hold a cloth over your
Hold a washcloth over that ear and then tip your head to the other side to let it all drain out. Then Repeat for the other side.

I guess the theory that cold and flu germs could enter through your ears sparked this remedy. It works best if you do this right when you begin to feel symptoms, or you have family or coworkers who have already gotten sick.

 Apple Cider Vinegar
 It loosens mucus and helps turn the body alkaline when it is acidic. To help prevent colds mix 1 teaspoon of honey with about an ounce of hot water, then and add 1 teaspoon to 1.5 Tablespoons of the vinegar. Increase your vinegar use when sick, but for prevention purposes you can keep it lower.  This is a life saver. It helps prevent sinus infections too. Just don't drink the Apple Cider Vinegar straight from the bottle, trust me you will regret it for the next 5 min. The honey and water are there for a reason!

Salt Water
This is my go to cure because no matter what, I always have warm water and salt. You simply make a mixture of the hottest tap water you can stand an add about a tablespoon of salt to it, it should be really saturated. Then you proceed to gargle with it for as long as it takes to finish off the glass. Do this at the first signs of a sore throat and once it sets it if you ignored your symptoms. It soothes the irritation and helps kill the germs that are hiding out in there. Works like a charm, every time, and its so easy.


AFFORDABLE ART

Erika @ Style Me GreenComment

Cultivating an art collection can be expensive and take years to perfect. When you are selecting pieces for your home you should consider your decor, and choose pieces that you love that will last the test of time. You don't want to rush it. One day when I was in the craft store buying spray glue for a school project I overheard a young married couple selection posters and art prints. The wife would say things like, "Okay, now we need a three foot poster for above the couch." Then the husband would walk around an pick out some things and add it to their pile. They were literally checking off the pieces as they went. There was no rhyme or reason to what they were choosing, just pieces that they thought looked okay, and fit their empty wall spaces. A rule of thumb that I like to apply when selecting art is, don't purchase art from the same place that sells posters of babies dressed up like flowers.

I love simple landscapes, vintage ad prints, and colorful abstractions. I find that I can only afford to purchase pieces for my home about 2 or 3 times a year depending on their price and size. To get around the hefty price tag that comes with art investment, I have framed all sorts of things from art show postcards to vintage playing cards. Here are a few ideas to get you going on a great collection of your own. I generally start with a simple wooden frame and most pieces look great framed in black, white, or gold with simple white mats. The piece above is a large sheet of marble paper, framed in an ikea frame. Wallpaper scraps, wrapping paper, or even the front page of a news paper could make a great statement.

I love this idea from the blog, Young House Love. They took paint chips and arranged them creating an ombre effect. This is such a versatile idea, it can be done in any color scheme, or on any scale- large or small.

One of my friend's made this piece for her husband as a Valentine's gift. Finding inspirational quotes can be a great way to celebrate your family, or like this example keep you motivated. I bet he thinks of her every time he reads it.


X-DESK TUTORIAL

Erika @ Style Me Green4 Comments
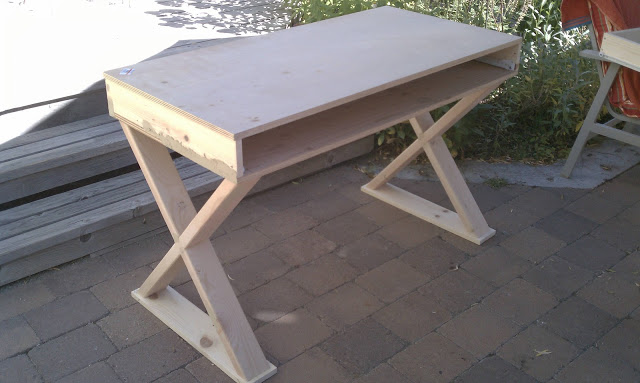
Monday I posted about all the DIY projects I worked on over the weekend, and as promised here is the tutorial for my desk. I want to preface this post by saying, I am not a furniture designer, or builder so this was a HUGE learning experience. The plans modified more than once due to miscalculations and plywood that wasn't, well, straight... But I am pleased with the overall completed design and I saved myself about $150 which you can't complain about! This post is really long and explanative, (pretty sure explainative isn't a word) so if you aren't going to build a desk, please enjoy the photos.


If you are going to build one yourself there are a few things you want to figure out, like, how tall do you want your desk to be, how deep and wide should it be, and if you need a drawer.

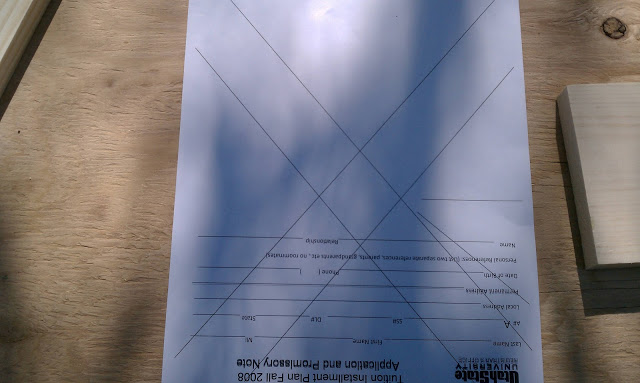
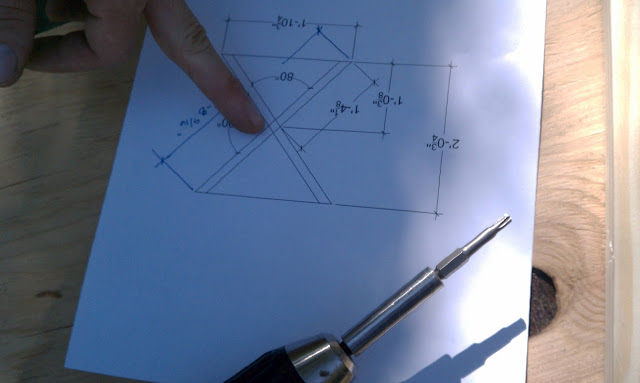
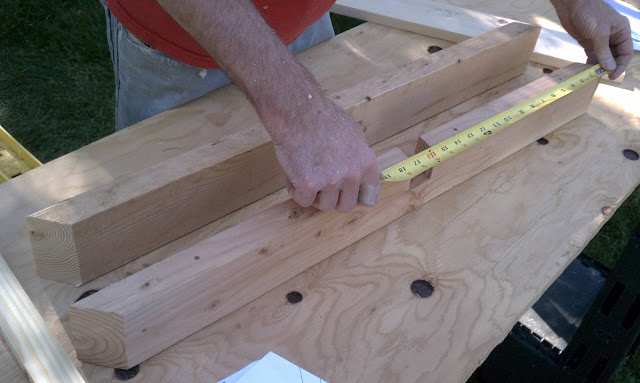
My desk is 32" high, 24" deep and 48" wide. (Because the lumber store sold 2'x 4' sheets of plywood) I had to use the computer to determine the angles at which my desk's legs met. I came out with a good even 100 and 80 degrees. (you can see this in the drawings below where the dimensions are notated) I then printed out a full size template of the angle so we could mark the 2x4s to cut for the legs.


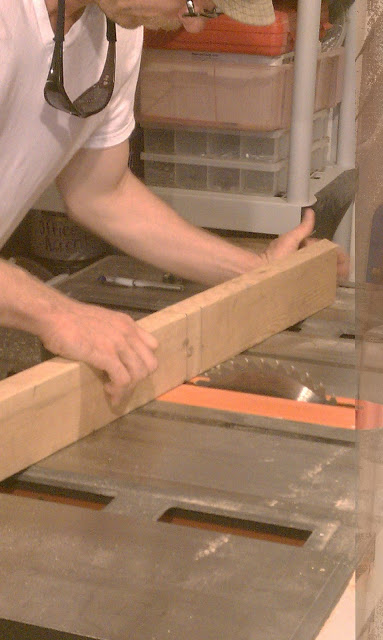
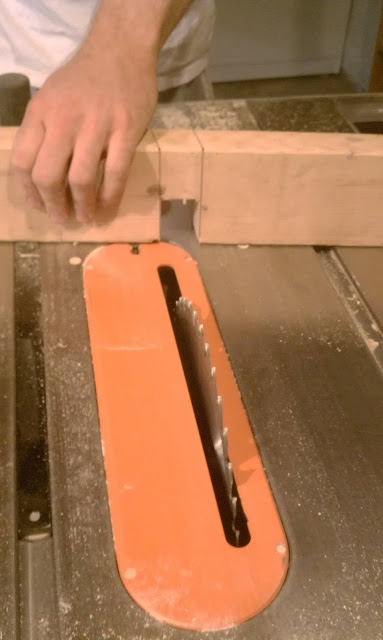
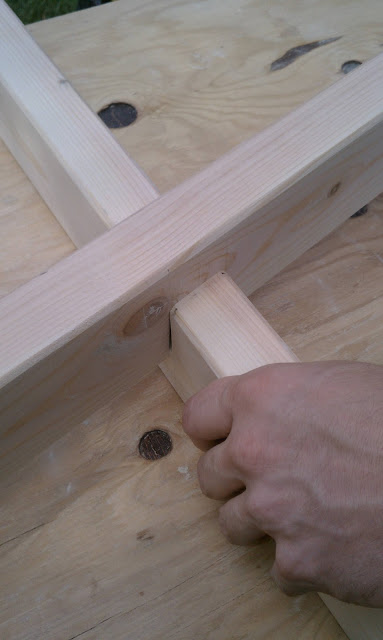
 Using the dimensions above, which I drew up in AutoCAD, We measured, marked and cut the wood for the legs. We set the circular saw to 40 degrees to give them the right angle to sit at, then proceeded to use our template to mark them for the center cuts. To make an X shape out of the 2 separate pieces, you have to notch out 1/2 of each piece of wood so they slide together. (If this doesn't make sense scroll down and look at the pictures, then come back)


Once everything was marked on the legs we set the height of the saw to be 1/2 the depth of the 2x4. (1.75") And John just kept running the saw back and forth under the wood until he had notched out the perfect hole. See below:


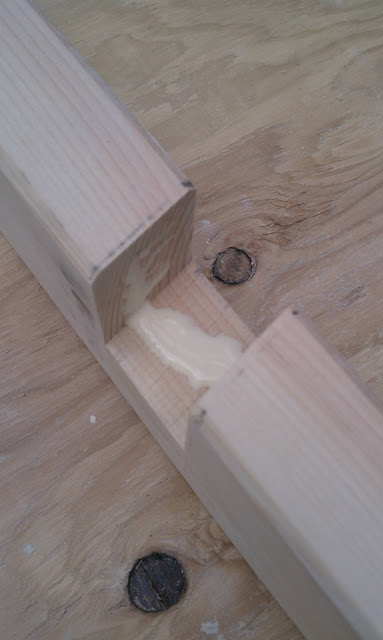
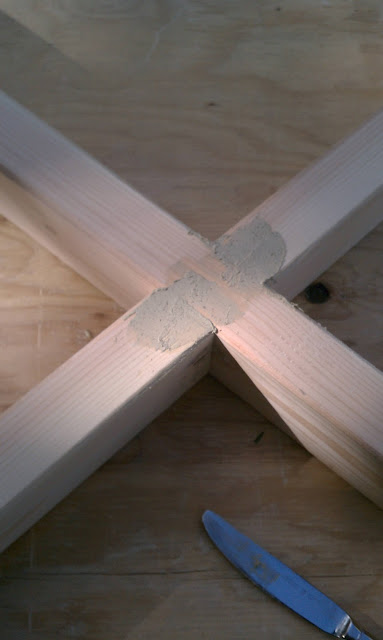
Once all of the holes are notched out, you can glue and screw the legs together. I am not going to lie, there were 3 "practice legs that we made with scraps before we cut the good wood. The legs are the hardest part of this project and if you aren't good at math, find someone who is. (We had help from a structural engineer and it was still hard). You can do it!


Once the glue is dry, fill the screw holes and joints with wood filler. Let the wood filler dry, and sand. 


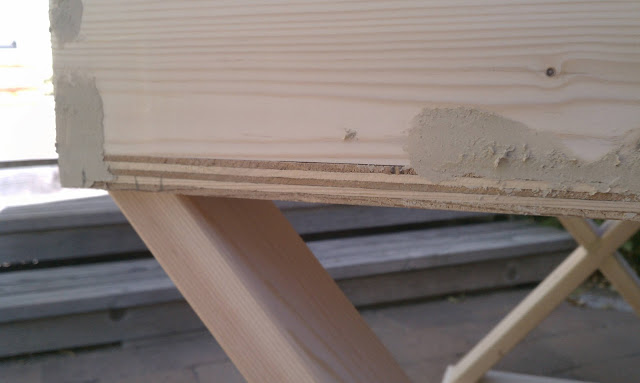
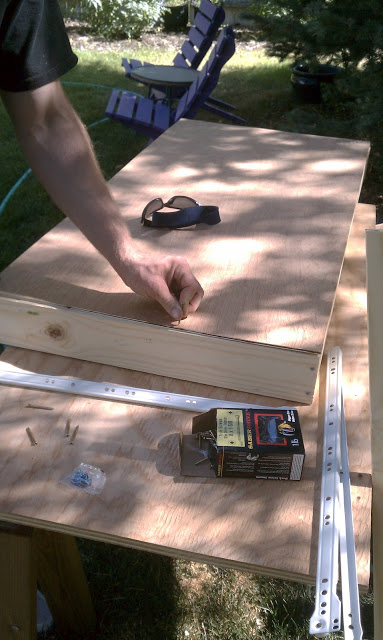
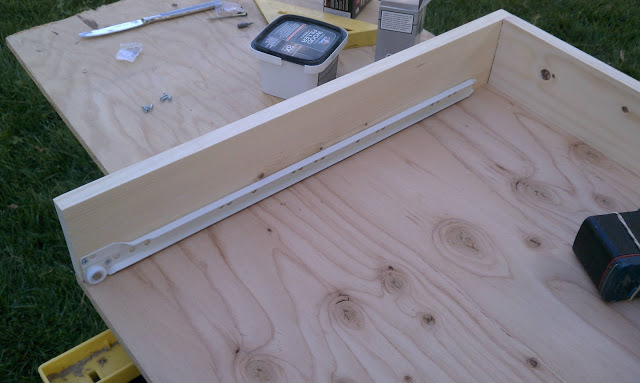
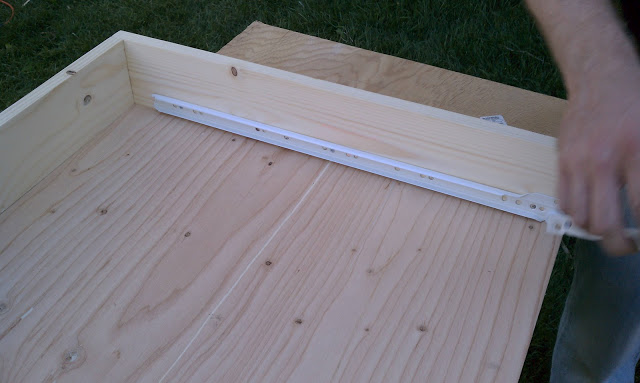
Once the legs were set we started on the top. The top is just a glorified box that opens in the front, where the drawer pulls out. We ended up buying 22" drawer slides that mount to the sides of the drawer, and the inside of the box. (You have to leave at least 1/2 an inch of space to allow for the instillation of the slides.)


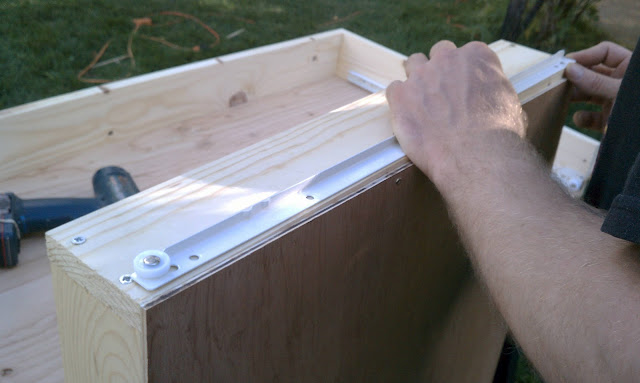
The above image is John tacking the bottom of the drawer onto the frame. We learned this the hard way, because we aren't carpenters, but you have to leave enough space above the drawer to remove it once the desk is built. So my drawer is permanently installed, it cant be removed, oops! And honestly, my motto throughout the entire week long experience was "It's okay, no one will notice that," or "I will just fill it with wood filler!" So we built the box, without the top, built the drawer, and then screwed the top on once the drawer was neatly inside.


Installing the drawer glides is easy if you read the directions that come with them. The wind blew the directions away, so we had to figure it out on our own. You should be fine if you install the glides 1/8 of an inch in from the edge of the drawer and the interior of the box.


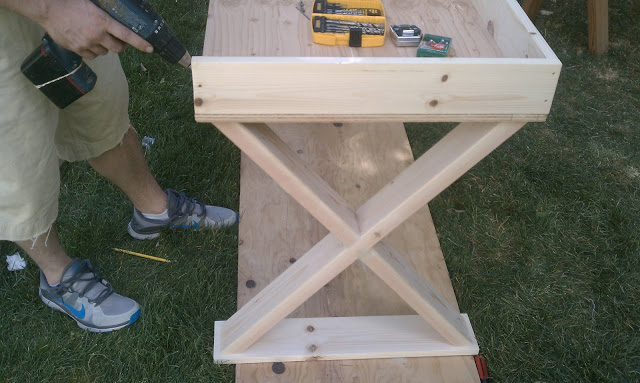
Once we had the top pieces assembled we screwed the legs onto a "base" piece made from a 1x6 that we trimmed down to 4" in width. You could leave out the base piece, but I felt like it looked like a picnic table without it. Then we screwed the legs to the bottom of our box.


I had originally intended on having the drawer slide into and be inset inside the box, so that the drawer front was mounted inside. But as it turned out the bottom piece of plywood was warped just enough that the drawer had a huge gap underneath it. It looked so dumb that I wanted to quit and walk away. John convinced me we could mount the drawer front on the outside of the frame, so it would hide the warping bottom. So I compromised on my original design, I liked having the drawer inside because it gave it the look of British campaign furniture. And I knew that mounting the drawer on the outside would make the desk look more modern, but at that point I knew I could select some more traditional knobs for the drawer and possibly make it okay.


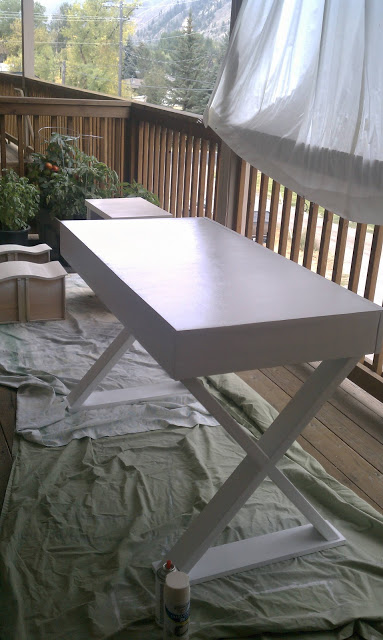
Once you get to this point all you have to do is fill anything that bugs you with wood filler, sand, and paint. I painted on 2 coats of kilz 2 primer, and then sprayed on a final coat of gloss white. Let it dry fully before you apply your next coats so you don't get a sticky/tacky finish. Good Luck! If you want detailed plans of this design leave a comment. If I have enough requests I will work on getting a PDF available for print out.


DIY BOOKENDS

Erika @ Style Me GreenComment
I am up to my elbows in an office overhaul, and I have been sourcing great office accessories all week. I found a whole list of DIY projects that would be great storage and organization solutions. (Just what I need, to add more to the DIY queue). These bookends have made it to the top of my list, just what I need for my bookshelves. Happy DIY Weekend!


HOW TO EAT WITH THE SEASONS

Erika @ Style Me Green4 Comments

I have been busy out in the garden harvesting all sorts of goodies, so today I wanted to share a list for eating and selecting foods with the seasons. Planning out your garden all year round, and selecting foods from the market that are in season will help you save money, and ensure that you are choosing foods that were grown closer to your home. It takes so much more money and energy to grow, harvest, and transport, a tomato to South Dakota in the middle of February than in late August. I know the winter food list isn't as appetizing as the summer list, but hey that's what canning is for right?

Update: for a great list on foods most contaminated by pesticides, see this post. 

fruits and veggies in season all year round

GIVEAWAY: FUTURE STANDARD

Erika @ Style Me Green19 Comments

I am excited to announce the August Giveaway, and it's right in time for all your back-to-school fashion needs! We are giving one lucky reader a $75 gift certificate to Future Standard Jessica Althoff is the founder of Future Standard, an online boutique that provides ethical clothing and accessories. I love their motto, "We do not compromise on style and do not think our values should get in the way of looking great."

HOW TO ENTER:

1. Like Style me Green AND Future Standard on Facebook

2. After you've done these 2 things leave a comment below stating how you would use your gift card, if you don't have a blog or google account please leave an email with your comment, so we can notify you if you're the winner!

FOR AN EXTRA ENTRIES

1.  Follow Style me Green on twitter/pinterest, be sure to leave an additional comment on this post (up to 2 extra entries).

2. Mention this giveaway on twitter/facebook/personal blog, be sure to leave an additional comment on this post (up to 3 extra entries).

3. Pin this giveaway on pinterest, be sure to leave an additional comment on this post (up to 1 extra entry).

The giveaway ends Monday August 27th at 11:59 PM.

One winner will be selected using random.org and will be notified by email!

*Remember you have to comment to be entered, if you don't comment you can't win.

NATURAL SPLIT END TREATMENT

Erika @ Style Me GreenComment

I hate split ends, they make your hair look dry and tired. If you have split ends it usually means your hair is not getting enough nourishment and moisture. Harsh shampoos, going out in the sun, blow drying, straightening, dyes, and bleaches all dry out your hair. I swear I get split ends 30 seconds after I get a haircut... but fortunately there are a few things that can help improve the health of your hair right now.

- Eat foods high in vitamins A, B, C, E and K to keep your hair from unnecessary breakage. Try adding more sweet potatoes, dark leafy greens, carrots, oranges, and plums to your diet.

- Use a natural leave-in conditioner in your hair before brushing. One of the worst things you can do is start brushing through your hair with a hairbrush when your hair's still wet. You'll end up with breakage, frizz and split ends to show for it. I use a honey leave in conditioner. Mix 2 tbsp  honey in 4 cups warm water and apply it to your hair after you shampoo/ condition.  Leave it in your hair. It will control hair dryness/frizz.

-Drink at least eight to 10 glasses of water each day, full glasses, not sips. When you aren't hydrated, your whole body suffers. Your skin and hair will show signs of dehydration, and dry hair and breakage are two of the most obvious signs.

-Avoid using shampoos that contain alcohol as it dries out hair. Use shampoos that contain natural ingredients. Excessive washing with harsh shampoos makes your hair ends dry.  Also, do not use hot water to wash your hair.

-Let your hair dry naturally, this saves energy- and if you are going to use styling tools will cut down on the amount of heat you are exposing your hair to later. Having said that, try to avoid styling tools if you can. I usually leave my hair straight and only use an iron for special events. There are natural ways to curl your hair, try rollers or a sock bun with damp hair.

-If all else fails, shave your head- JK!  But, give this egg rinse a try about twice a month. It's pretty easy, and if you are set on sticking to shampoo and conditioner it will give your hair shine and moisture without using manufactured products.

how to get rid of split ends

Egg Rinse:

Mix egg yolk in 3 tbsp olive oil and 1 tbsp honey. Gently massage this mask in your hair and cover with a shower cap. Leave it on for half an hour and wash it with a mild alcohol-free shampoo.

ROSE FACIAL TONER

Erika @ Style Me GreenComment

It was a super slow DIY weekend, so here's a recipe for facial toner that I live by. I used to just use witch hazel because it gently cleanses pores and helps remove the last traces of dirt, oil, and makeup. It always left my skin feeling soft, moisturized and refreshed. But, recently I started adding rosemary and rose petals because it stimulates circulation to skin, and helps clear and revitalize congested or sluggish skin. Plus it smells great!

rose facial toner

INGREDIENTS:

3 1/2 cups witch hazel

1/2 cup dried rose petals

5 sprigs of fresh rosemary

DIRECTIONS:

Mix ingredients together making sure it is all blended well, let sit for a few minutes. Strain. Splash, or dab with cotton ball on your face after cleaning skin. Make sure to store in an airtight container.